
About this version of the User Guide
Table of Contents
How to get access to DataWiz?
- Register: In order to create a new DataWiz account, all you have to do is to click on Register. Thereafter, you just need to enter a valid email address and password. After submitting your
 information, you will receive an email with an activation link. To complete your registration, click on this link. Afterwards, you will be able to sign in.
 - Invitation: If you were invited by a colleague to register with DataWiz, just click on the link provided in the invitation email and proceed with the registration (as described above).
- Deactivate your Account: If you want to deactivate your DataWiz account, … function is not implemented yet
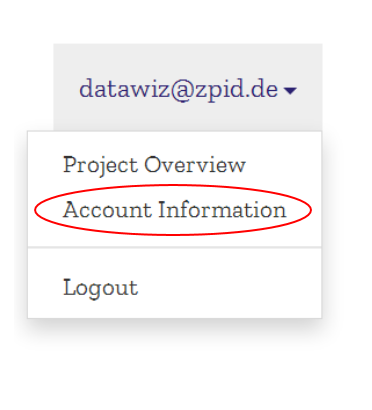
- Editing Account Information: You can edit your account information by clicking on your email address in the top header and choosing Account Information in the drop down menu. Here, you can edit your contact data (e. g. phone, fax, website, address) or change your password. Moreover, you can add an alternative email address in this section.
Your first visit on DataWiz
The project list
If this is your first time using DataWiz, your list of projects will be empty:

If a colleague invited you to join his/her DataWiz project, you will see this project in your list. However, you will only be able to enter the project after a project administrator granted you access rights to parts of the project. Which parts of a project will be visible to you, depends on the kind of rights you were granted.
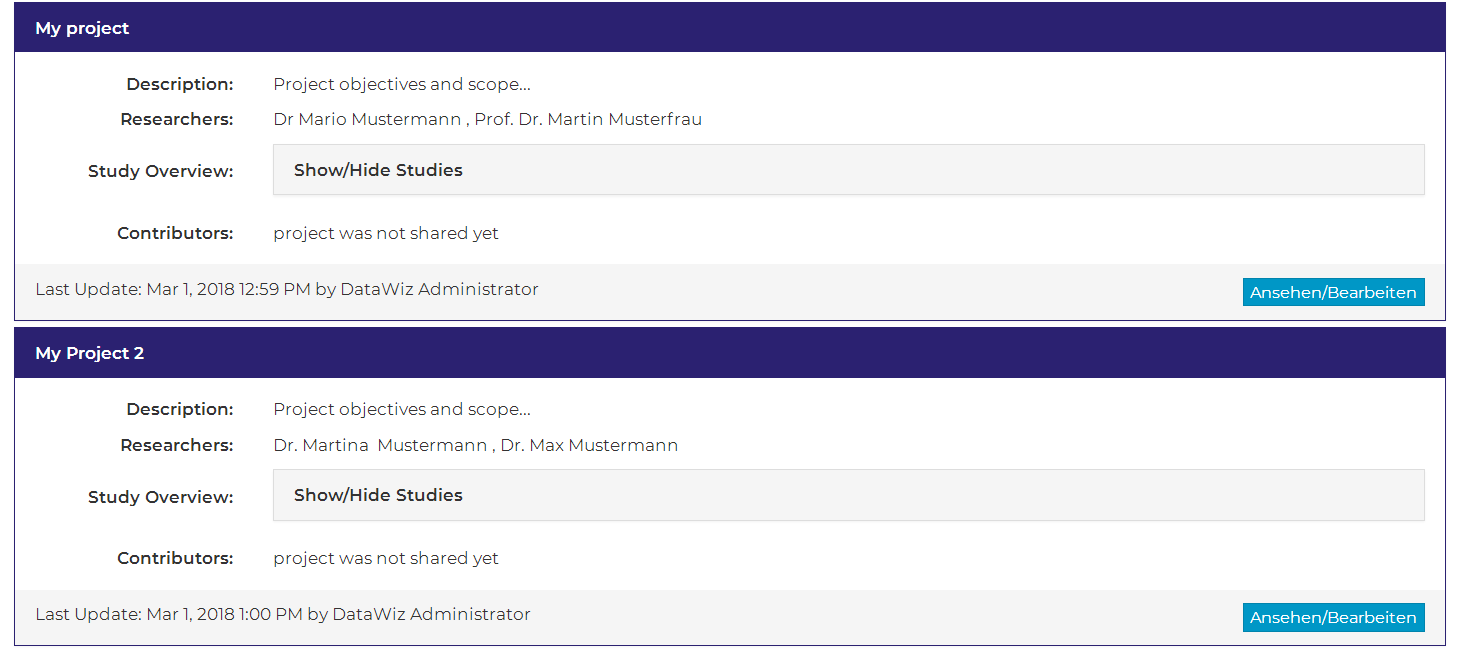
The list of projects that you have access to will grow eventually. Project information that is provided in this list, helps you to easily identify the project you are looking for. It includes the following information on each project:
- name of the project (inside the blue header)
- bibliographic authors that were entered in the project documentation
- a brief description of the project, based on the description that was entered in the project documentation
- an overview of studies that are part of the project. Click on show/hide studies in order to show all studies that are part of the project and enter a study by clicking on a study’s name.
- an overview of all DataWiz users that were added to the project (do not confuse with bibliographic authors, see section Co-Authors for further information)
- date of last update and name of the person who updated
In order to enter a project, simply click on the project name (blue header). To filter your projects by name, description or co-authors, you can use the search function above your list of projects. You can specify the level of your search (search within the project or a study) via the drop down menu next to the search bar.
![]()
Navigation in DataWiz
There are two possibilities to navigate in DataWiz:
1. Use the top header in order to comfortably navigate within DataWiz. This way you can easily jump to overview pages at project-, study- or dataset level by clicking on list of projects or the project/study/dataset name.

2. Another way to navigate in DataWiz can be found on the left side on any page in DataWiz via the blue content button (see image on the left side). If you click that button, a project summary will open up (see below) which shows a detailed overview about your project and allows you to jump easily to any part of your project.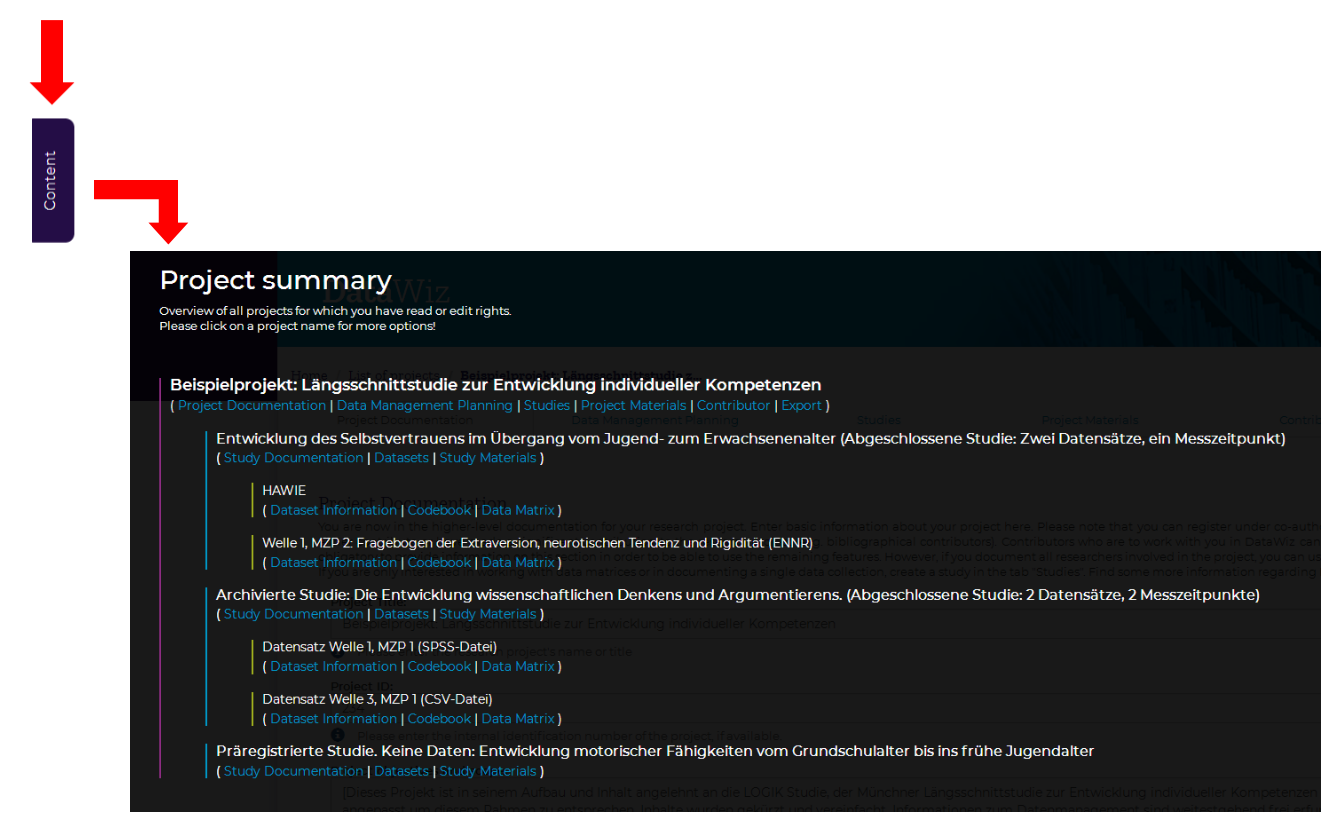
Language Selection
![]() The DataWiz web application is available in German and English (whereas the user guide and knowledge base are only available in English). You can select your preferred language by either clicking on the German (DE) or English (EN) abbrevation symbol in the upper right corner. If you have added new input, please save your entries prior to changing the language, otherwise you will lose unsaved information.
The DataWiz web application is available in German and English (whereas the user guide and knowledge base are only available in English). You can select your preferred language by either clicking on the German (DE) or English (EN) abbrevation symbol in the upper right corner. If you have added new input, please save your entries prior to changing the language, otherwise you will lose unsaved information.
Attention! Because of performance reasons, DataWiz was developed to save certain objects in the browser session. Therefore, it is not advisable to work with two open tabs, otherwise the session will be overwritten and data may be lost.
Project-Level
Creating, Editing and Deleting Projects
At project-level you can create and manage your project(s). In the following sections, we will provide a brief description of all project-level features:
- Create a new project: All you have to do in order to create a new DataWiz project is to click on Create New Project, enter your project’s name and save this information. All other information is optional at this stage.
- Edit an existing project: In order to edit an existing project, click on its entry in the list of projects.
- Delete a project: In order to delete your project click on delete project on the project documentation tab and confirm the deletion by entering delete in the appearing text box. Deleting a project is irreversible. All project metadata, studies, datasets and supplemental materials, that are included in this project, will be deleted permanently for all users. If you want to leave a project (i.e., you want no longer to be part of the project yourself, but other users will still be able to access it), you should not use this option. Instead, ask a project administrator to remove you from the project.
After choosing a project and clicking on it, you will enter a project and the project tabs appear. This includes the tabs Project Documentation, Data Management Planning, Studies, Project Materials, Contributors, and Export, which will be further explained in the following.

Project Documentation
Within the Project Documentation, you can provide basic information on your project (e.g., name and ID of a project, information on the principal investigator and project funding).
Co-authors: Please note that co-authors (bibliographic contributors) are not automatically contributors in the DataWiz web application and vice versa. For example, not every student assistant, who has access rights in DataWiz, did substantially contribute to the project in a way that justifies authorship. At the same time, researchers that have substantially contributed to the project or still substantially contribute to the research project may not be contributors in the DataWiz project. Therefore, DataWiz differentiates between co-authors, which for example should be mentioned in publications, and contributors which are involved in the DataWiz project. Please enter every person which essentially contributed to the project in the field co-authors. As soon as you create studies, you can assign the authors to the respective studies.
Please note: Only co-authors who are listed in the project documentation dialogue can be assigned to studies!

Data Management Planning
The data management planning consists of text fields which are organized under different topics (Administrative Data, Research Data, Documentation, Data Sharing, Storage and Infrastructure, Organization and Policies, Ethical and Legal Aspects, and Costs). The purpose of these pre-structured text fields is to offer guidance on issues that have to be considered when planning your data management. Answer these fields as concisely or detailed as your project requires and omit fields that are not relevant to your project.
Next to some fields, you will find icons. These icons mark information that is required by the guidelines of selected funding agencies (the EU’s Horizon 2020 program, the BMBF and the German Research Foundation (DFG)). Thus, DataWiz helps you to generate data management plans that are adjusted to these funding agencies’ requirements. Icon assignment is based on the following policies:
- for BMBF (only german): Richtlinien für Zuwendungsanträge auf Ausgabenbasis, AZA and Checkliste zur Erstellung eines Datenmanagementplans in der empirischen Bildungsforschung
- Horizon 2020: Guidelines on Data Management in Horizon 2020
- DFG Guidelines on the handling of research data and the German Psychological Association’s (DGPs) Specification of the DFG Guidelines.
While editing your Data Management Planning, you can switch between tabs (e.g. from Administrative Data to Documentation) without losing any information. However, before editing something outside the Data Management Planning tab, e.g. in Project Materials or Studies, you have to save your work by clicking on the Submit button at the bottom of the site. Otherwise, all your changes in the Data Management Plan will be lost!

Tips:
- It may be very helpful to generate a data management plan even if it is not required by your funding agency or institution. Compiling data management plans facilitates data analysis, drawing up manuscripts or sharing data.
- To read more on the structure and purpose of data management plans, please refer to the knowledge base’s site on data management plans.
Data Management Plan export
The DMP section of DataWiz offers several export functions. As already noted above, the icons next to some fields help you to determine the required fields for several funding agency guidelines. Additionally, DataWiz offers a funding agency specific export function, which is currently still in work. DMP export will be available, adjusted for BMBF, H2020, DFG, PsychData and Preregistration requirements. This feature will be accessible via the dark blue button (“export data management planning”) in the upper right corner of the Data Management Planning tab.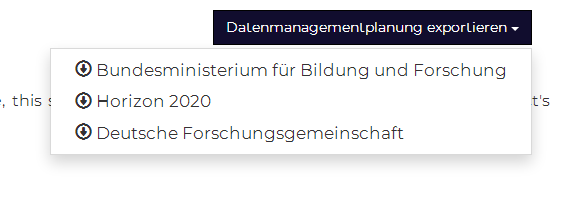
The export file is created in Open Document Format and contains a mapping of the respective DataWiz fields to the specific requirements of the funding agencies. In this way, you can easily access the most important information in your data management plan, tailored to the requirements of the respective funding agency, in one document.
If you are interested in seeing which DataWiz fields have been assigned to which Funding Agency Guideline’s fields, you can view the detailed mappings for each funding agency on the Technical Report page.

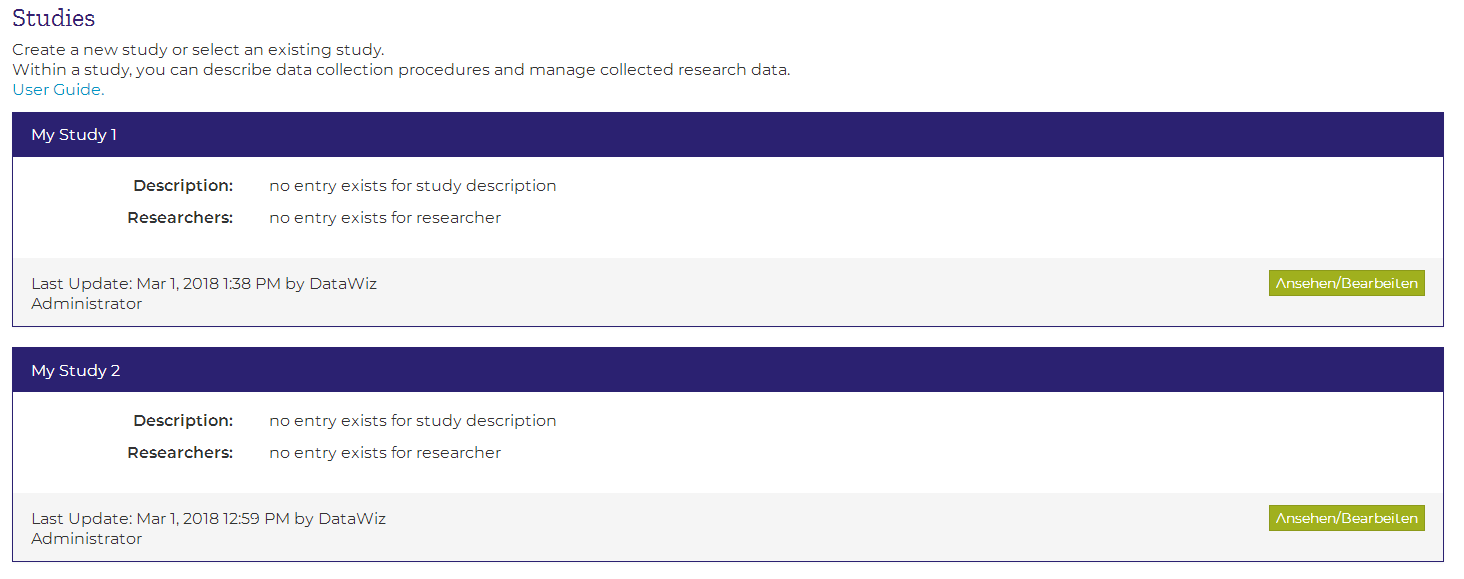
Studies
You will get an overview of all studies that were created within a project by choosing the Studies tab in the project top-menu (if you have only access rights at study-level within a project, this will also be your starting page for this project). Here, you can see basic information on each study that was created within this project, like description, involved researchers and information about the last update. If no studies exist, the list of studies will be empty. Further below you can find more information on Study-Level features.

Project Materials
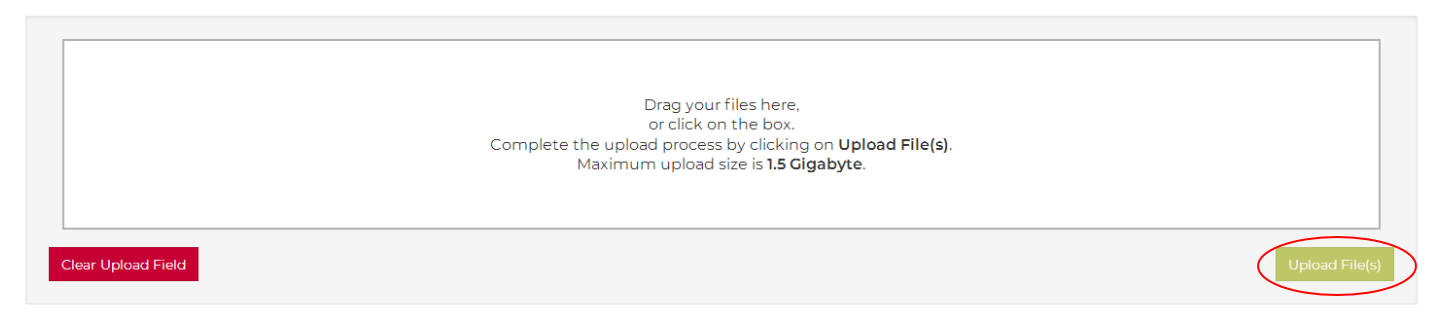
Files with relevance to the overall context of a project (e.g. requirements of funding agencies, applications for ethical approval, publications) can be uploaded in the Project Materials section. Please note that in order to complete the upload process you have to click on the green Upload File button! Uploaded files can be safely stored here and shared with your coworkers. However, materials which can be clearly related to a specific study should be stored on study-level as study materials.
For all uploaded files, a checksum is automatically generated. Checksums can be used to ensure data integrity. You can find more information on this issue in the knowledge base’s section on data integrity.

Contributors
Features of this section are only available to project administrators. The section provides an overview of all project users and allows administrators to invite new contributors or change access rights of existing contributors.
Inviting new contributors

In order to invite a contributor to your project, enter the contributor’s email address in the Add user field and press the Invite to the project button. As soon as the invitation has been accepted, you will receive a notification mail and the invited contributor will appear in the list of contributors. Thereafter, you can grant access rights to the new contributor. Next to the invitation field, you can see all pending invitations.
Access Rights

If you are a project administrator, you can change contributors’ access rights by adding or deleting roles. Possible roles in DataWiz are:
- Project administrator
- A project administrator has global reading and writing permissions, as well as administrative rights (such as adding or deleting contributors and granting roles). The initial project administrator (project creator) can grant administrative rights to other contributors, which means that there can be more than one project administrator. However, only the project creator’s rights cannot be changed by any other project administrator.
- A project administrator is also entitled to upload/edit/delete project and study contents.
- Global read permission
- Users with global read permission can see and read all contents of the project and associated studies, but cannot make any changes to them, nor add new contents.
- Global read and write permission
- Users with global read and write permission can read and change/edit all existing project contents, as well as adding new contents.
- Read permission for
- Apart from global read permissions, read permissions can also be limited to specific studies. Project-level contents are not available.
- Read and write permission for
- Apart from global write permissions, write permissions can also be limited to specific studies. Project-level contents are not available and creating studies is disabled.
Tip: Roles can be combined. For example, a user can be granted a global read permissions and an additional write permission for a specific study.

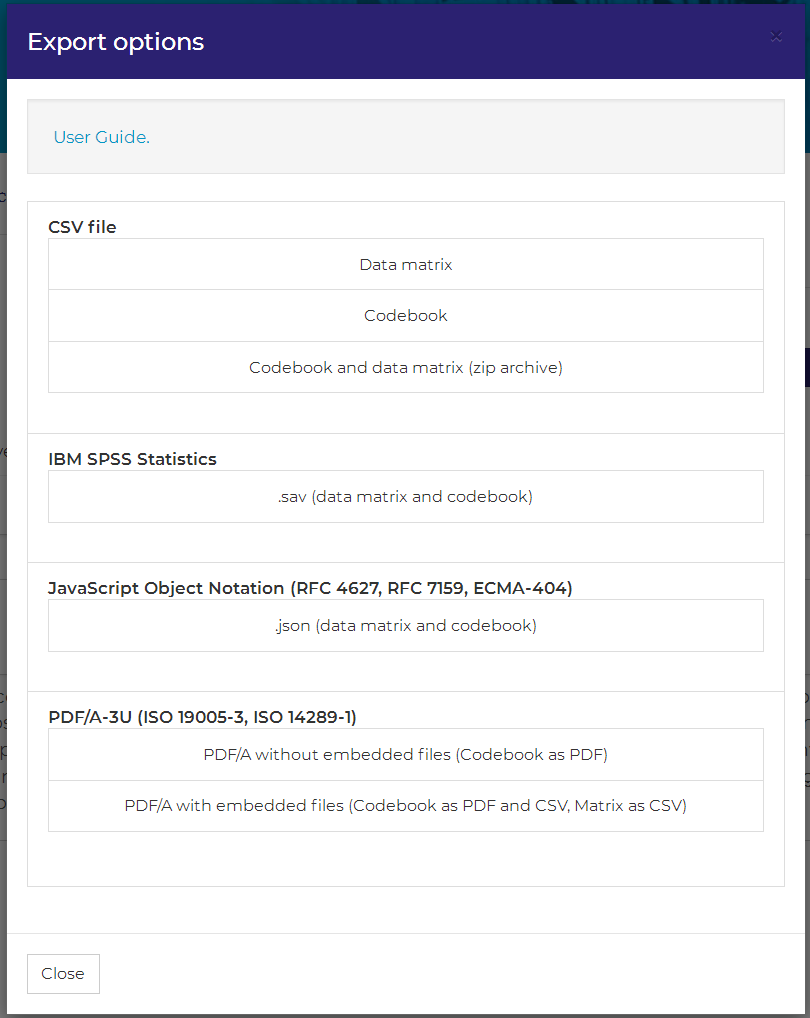
Export
![]() In the export section you can specify which parts of your DataWiz project you want to export. You can choose between exporting the whole project and all of its components or selecting a subset of components for export. The selection procedure is based on the hierarchical structure of DataWiz (project level, study level, dataset level). Refer to the screenshot on the right to see an example. Of course, the export structure will depend on the information you entered in DataWiz. If you created e.g. 2 studies, 2 studies will be shown.
In the export section you can specify which parts of your DataWiz project you want to export. You can choose between exporting the whole project and all of its components or selecting a subset of components for export. The selection procedure is based on the hierarchical structure of DataWiz (project level, study level, dataset level). Refer to the screenshot on the right to see an example. Of course, the export structure will depend on the information you entered in DataWiz. If you created e.g. 2 studies, 2 studies will be shown.
Tip: If you only want to export a single dataset, you can also choose from a set of format and export options which are available at the dataset level.
In the export dialogue, the following information is shown:
- All project components are shown. Moreover, in order to support you in your decision if and how you can share your data, information entered in the data management planning and study documentation dialogue is used. Based on these information, warnings are shown that aim to remind researchers of possible confidentiality issues when sharing the data, e.g. when sensitive data are collected. On the examplary screenshot of the export menu, warnings are indicated by the red arrow.
- You can customize the content of your export package by ticking the corresponding boxes.
- Project level (all components or a subset of the following components)
- Documentation
- an XML-file that contains the project documentation
- Materials
- all files that were uploaded to project material
- Data Management Planning
- an XML-file that contains the data management plan
- Documentation
- Study level (all components or a subset of the following components)
- Documentation
- an XML-file that contains the study documentation (this XML-file is DDI compatible)
- Materials
- all files that were uploaded to study materials
- Documentation
- Dataset level (all components or a subset of the following components)
- Codebook
- the codebook as PDF
- Datasets
- the dataset as CSV-file
- Codebook
- Project level (all components or a subset of the following components)
After you have finished this selection of export components, you can click on the export button. Please note, that materials are not allowed to be larger than 20 MB per file. Larger files have to be exported manually. A zip-container will be generated whose structure adheres to the hierarchical structure of DataWiz: On the first level of the folder you can find the project documentation XML-file and a folder with supplementary files (project materials) as well as a studies-folder. The studies folder contains a folder for each study that was created within the project (e.g. if your project has 3 studies and you chose to export all of them, there are also 3 folders inside your studies folder). Each study folder contains the study’s documentation as XML-file, a folder with supplementary files (study materials) and a records folder which contains codebook and datasets. See below for a schematic structure of the export zip folder: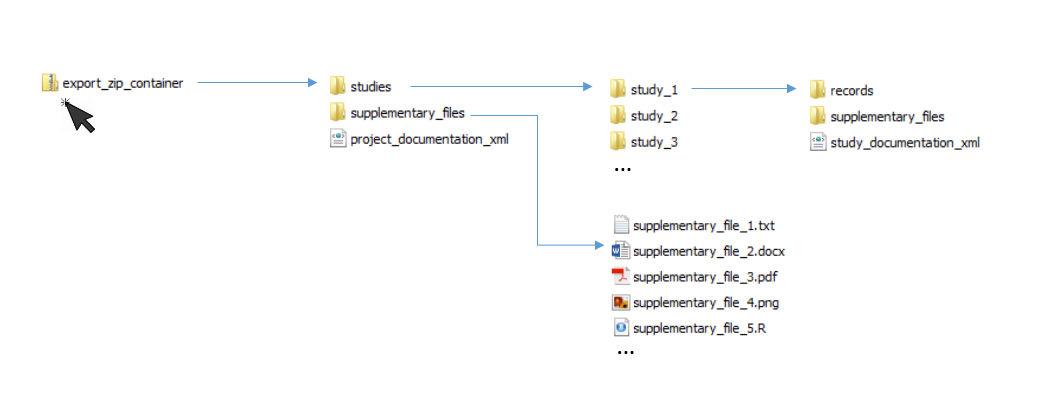
Study-Level
Creating, Editing and Deleting Studies
- Create a new Study: You can create a new study by clicking on Create Study in the study overview.
- Delete Study: In order to delete your study click on delete study on the study documentation tab and confirm the deletion by entering delete in the appearing text box. Deleting a study is irreversible. All study metadata, datasets and supplemental materials, that are included in this study, will be deleted permanently for all users.
- Edit Existing Study: In order to edit an existing study, click on its entry in the study overview.
- After entering the study, the study top menu will appear. Inside the study, you can choose between the tabs Study Documentation, Datasets and Study Materials, which will be further described in the following.

Study Documentation
You can document your study by choosing the Study Documentation tab in the study’s top menu. The study documentation is subdivided in Administrative Data, Design, Sample, Data Collection, 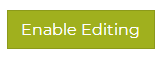 and Ethical and Legal Aspects. In order to edit the documentation you have to activate the webform by clicking on the Enable Editing Button. If the study is not currently blocked by another user, who is working on the study documentation, you will thereafter be able to edit the fields of the webform. The
 ![]() and the
and the ![]() icon help you to identify fields that are relevant at the current stage of your study.
icon help you to identify fields that are relevant at the current stage of your study.
The ![]() icon indicates fields that are relevant for the preregistration of a study and can be filled out before the study starts (assignment of this icon is based on the suggested template for pre-registration in Social Psychology by Van’t Veer and Giner-Sorolla (2017)). Detailed information on the mapping procedure, can be retrieved from the technical reports section.
icon indicates fields that are relevant for the preregistration of a study and can be filled out before the study starts (assignment of this icon is based on the suggested template for pre-registration in Social Psychology by Van’t Veer and Giner-Sorolla (2017)). Detailed information on the mapping procedure, can be retrieved from the technical reports section.
The ![]() icon indicates fields that are required if you want to deposit your data with PsychData. Detailed information on the mapping procedure, can be retrieved from the technical reports section.
icon indicates fields that are required if you want to deposit your data with PsychData. Detailed information on the mapping procedure, can be retrieved from the technical reports section.

Datasets
You will get an overview of all datasets that were created within a study by choosing the Datasets tab in the study top-menu. Here, you can see basic information on each dataset. If no dataset exists, the list will be empty. Below you will find more information on Dataset-Level features.

Study Materials
Files with relevance to a specific study (e.g. questionnaires, templates of informed consent sheets (please no sheets containing personal data in order to ensure confidentiality), raw data, which can not be organized in rectangular matrices (e.g. fMRI-, video-, or syntax-files) can be uploaded in the Study Materials section. Uploaded files can be safely stored here and shared with your coworkers. However, materials which cannot be clearly related to a specific study should be stored on project-level as project materials. For all uploaded files, a checksum is automatically generated. Checksums can be used to ensure data integrity. You can find more information on this issue in the knowledge base’s section on data integrity.
Tip: Rectangular data matrices should be stored as dataset and not as study material (more information below).
Dataset-Level
Creating, Editing and Deleting Datasets
- Create a new Dataset. You can create a new dataset by opening the Datasets tab at study-level and clicking on the button Create new Dataset. Then, enter your dataset’s name and save it. All other information is optional at this stage. The tabs Codebook and Data Matrix are empty when you create a new dataset. Information in these tabs appears as soon as a file has been uploaded to the dataset.
- Delete a Dataset. In order to delete a dataset click on delete dataset on the dataset information tab and confirm the deletion. Deleting a dataset is irreversible. All versions of its data matrix and of its codebook will be deleted permanently for all users.
- Edit an Existing Dataset. In order to edit an existing dataset, you have to click on the dataset’s name (in the blue header) and you will enter the dataset.
- After entering the dataset, the dataset top menu will appear. Inside the dataset, you can choose between the tabs Dataset Information, Codebook and Data Matrix, which will be further described in the following.

Dataset Information
On this site, you can describe your dataset briefly. Additionally, this site provides functions for importing and exporting datafiles or for inspecting the history of your dataset. You can access these features by clicking on the respective buttons in the upper right corner.
File Import
DataWiz imports two kinds of data files:
- CSV-files or other delimiter (e.g. tab, semicolon, …) separated value files
- SAV-files
In order to import a data file to a data set, choose Upload file. In the following menu, you have to select the file type (CSV or SAV). Menus will differ depending on the data file type you are importing:
CSV-File Import
If you want to import a CSV-file, choose the file type Comma-seperated-values (.csv, .txt, .dat). By choosing Select file, you can navigate to the file you want to upload. Thereafter, the following properties of your file have to be specified:
- Headline: Is there a headline in your CSV-file, which contains the variable names?
- Separator: Which delimiter character is used to separate values in your matrix? Options are comma (,), semicolon (;), tabulator, period (.), colon (:), and space.
- Quotes: Which delimiter character indicates a string’s beginning and ending? Options are double quote (“) or single quote (‘).
DataWiz expects uploaded files to use UTF-8 character encoding. Using a different character encoding will most likely result in an incorrect import of string variables (more information on character encoding). Please note that you do not have to specify the decimal mark of your dataset, because DataWiz will automatically recognize period or comma as decimal mark. Additionally, a description of file changes in the Changelog field is always mandatory.
If you are working with R, you can use the following syntax for creating an export of your dataframe that can be imported in DataWiz easily: write.csv(x = mydata, file = “filename.csv”, row.names = F, fileEncoding = “UTF-8”).
SPSS-File Import
If you want to import a SAV-file, choose the file type IBM SPSS Statistics-data file (.sav). By choosing Select file, you can navigate to the file you want to upload. No further specification of properties is required for SAV-files. However, a description of changes is always mandatory.
Checking and Completing Data Import
Variable information is automatically extracted from the uploaded file during data import (e.g. by identifying variable types or number of decimal places) and the accompanying data matrices are imported to our system. Values of numerical and date variables are automatically transferred to a consistent notation. Please check your import’s correctness in 3 steps:
(1) Check for Warnings
If any warnings are displayed: Inspect all warnings and carefully consider if you can proceed. You may have to cancel the import process, edit the uploaded file outside of DataWiz and reupload it.
(2) Check the displayed variable information
DataWiz will show you variable information, that were extracted from the current data file, and will compare this information to the already existing variable information in DataWiz (e.g. information that stem from previous uploads). All variable information in DataWiz will be replaced by imported variable information (information that can be directly extracted from the imported datafile). In case of extended variable information (information that cannot be directly extracted from the imported data file), you have to decide for every variable, if the codebook’s information should be carried over or not. If the box Transfer Extended Metadata is checked, the information will be taken over. If the box is not checked, already existing variable information under extended variable information will be removed or replaced with the information of the currently uploaded file (if available).
Imported and extended variable information will differ depending on the uploaded file’s type (i.e., SAV file or CSV file). When importing SAV files, the variable information (label, value labels, missing values, alignment, measurement level, role and user-defined attributes) can be automatically imported whereas this is not possible for CSV files.
Our color scheme helps you to decide if information should be carried over or not by automatically detecting, whether uploaded variables are likely to be newer versions of already existing variables (in DataWiz). In general, extended variable information should be imported if possible.
Exception: If you have edited your codebook outside of DataWiz, this rule does not apply. In this case, we recommend not to carry over the extended variable information, because changes will get lost (even if the “traffic light” is green).
 Colors used:
- If the lower row is green, we recommend adopting extended metadata (in grey). The box Transfer Extended Metadata is checked by default in this case.
- If the lower row is blue, a variable has been added (therefore, no extended metadata exists for this variable).
- If the lower row is yellow, the adoption of extended metadata will likely be reasonable (e.g. adopting the label while variable type changed).
- If the lower row is red, you should thoroughly examine if an adoption of extended metadata is reasonable.
Please note: Codebook information can not be edited within the Checking and Completing Data Import dialogue.
(3) Check if the data matrix has been imported correctly
As final step, you should check whether any errors occurred during the import of your data matrix (e.g. adjusting the decimal symbol or date format). Afterwards, you can finish the import process.
Some Notes on File Import
Import of new data set versions can be highly simplified by adhering to the following simple rules when working on your data files:
- Edit your codebook only in DataWiz and not locally on your computer.
- If you need to work locally, always export the dataset’s newest version from DataWiz before starting your work.
- Do not change name and type of a variable simultaneously.
- Do not change variable names and order of variables simultaneously.
- If only one information out of variable type, variable name or order of variables changes, DataWiz will in general be able to recognize this change and keep the information that is connected to this variable.
Please note that DataWiz does not check for changes in data matrices, but saves the data matrices anew for every version of the dataset. Therefore, you can always access older versions of the data matrix via the version history of your dataset.
Import of String Variables
When importing Data from CSV-files, use quotes to indicate strings:
"Text Text"
'Text Text'
If you are not using quotes, CSV-files often cannot be interpreted correctly (i.e. if the values of string variables include characters that are used as delimiters):
e.g. for comma-separated files the value "Text, Text" or 'Text, Text' is interpreted as one single value, while Text, Text is interpreted as two distinct values
Import of Date Variables
If you are uploading CSV-files that contain variables of type date, you should enter the year with four digits. Date formats that contain only two digits for year YY are parsed to 20YY. The following date formats are supported by DataWiz (i.e., a variable will be recognized as date on data import, if all of its values follow any of these conventions):
MM/dd/yyyy
MM/dd/yyyy HH:mm
MM/dd/yyyy HH:mm:ss
MM/dd/yyyy HH:mm:ss.SSS

MM/dd/yy
MM/dd/yy HH:mm
MM/dd/yy HH:mm:ss
MM/dd/yy HH:mm:ss.SSS

dd.MM.yyyy
dd.MM.yyyy HH:mm
dd.MM.yyyy HH:mm:ss
dd.MM.yyyy HH:mm:ss.SSS

dd.MM.yy
dd.MM.yy HH:mm
dd.MM.yy HH:mm:ss
dd.MM.yy HH:mm:ss.SSS

dd-MM-yyyy
dd-MM-yyyy HH:mm
dd-MM-yyyy HH:mm:ss
dd-MM-yyyy HH:mm:ss.SSS

dd-MM-yy
dd-MM-yy HH:mm
dd-MM-yy HH:mm:ss
dd-MM-yy HH:mm:ss.SSS

HH:mm
HH:mm:ss
HH:mm:ss.SSS
Dataset Export
 You have several options for data export at the dataset-level:
- CSV
- Data matrix as CSV
- Your data matrix is exported as simple CSV-file. The export format is: headline = variable names (without quotes), delimiter = “,”, quotes = “”, decimal mark = “.”
- Codebook as CSV
- Your codebook is exported as simple CSV-file. The export format is: headline = property names (without quotes), delimiter = “,”, quotes = “”, decimal mark = “.”
- Codebook and data matrix as zip archive
- This option exports codebook and data matrix as CSV-files and stores them in a zip-container. The export format of both files is specified above.
- Data matrix as CSV
- IBM SPSS Statistics .sav-file
- This option exports your dataset as .sav-file which contains data matrix and codebook. SPSS’ .sav-files support a maximum of 16 decimal places. Thus, when exporting to .sav, all values will be rounded to 16 decimal places. Moreover, you can assign several value labels for the same value in DataWiz, when exporting to .sav, only the last value label is carried over. The maximum width of string values for .sav export is 32000 characters .
- Java Script Object Notation (JSON)
- This option exports codebook and dataset as JSON file. Import of JavaScript Object Notation files is supported by many programming languages (including R).
- Codebook as PDF
- This option exports the codebook as PDF file.
- The codebook also includes several descriptive statistics for every variable, like e.g. mean, standard deviation or minimum and maximum value
- Codebook as PDF with embedded CSV-file for data matrix and codebook.
- This option exports the codebook as PDF file. Data matrix and Codebook are attached as CSV-files.
Tips on R-Import:
- You can easily import CSV-files, that were exported by DataWiz, in R by using the read.csv command with the following specification: read.csv(file = “filename.csv”, encoding = “UTF-8”)
- You are currently required to change the format of date variables, because the default format for date variables, that is used in DataWiz, is the US date format, i.e. MM/DD/YYYY. To correctly display date variables, you can employ the following syntax in R: as.Date(mydata$myvar, format = “%m/%d/%Y”)

Version History
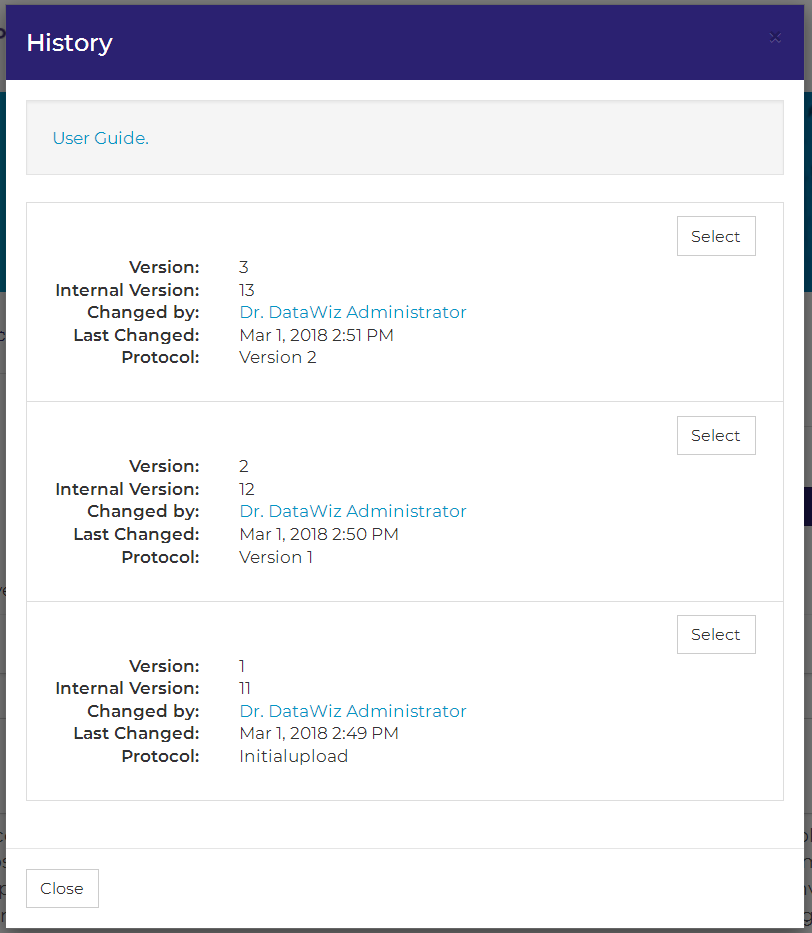 Using the version history of a dataset, you can track changes that were made to your dataset and restore older versions of your dataset. You can enter a dataset’s version history by choosing the dataset information tab and clicking on the button version history in the right upper corner.
Thereafter, the version history window opens and lists all versions of the dataset. Via the select button you can enter a version and inspect its codebook and data matrix. In order to restore the selected version as current version, simply re-save the dataset. By saving the selected version, it will become the current version of the dataset.
Note: The dataset information in the history window aims at facilitating the selection of a specific version. You may ignore the internal version number. However, as this internal version number is used in the DataWiz-URL, you can use it to quickly switch between versions.
Example:
URL: .../DataWiz/project/1/study/1/record/1/version/1/codebook
Codebook
Within the header section above the codebook, you see the number of variables in the current dataset and you can select the number of displayed variables. In order to select the displayed variables just chose a number in the two respective dropdown menus (“from” and “to”) and click on the green show button.

Within the Codebook tab, you can provide variable information for your dataset:

Name: You can enter or change the name of a variable. The following restrictions apply: Valid variable names start with a letter or the special character “@”. All special characters apart from “. _ $ @ #” are generally invalid for use in variable names!
Type: DataWiz differentiates between the three types numeric, date and string. You cannot change the type of a variable within DataWiz.
Label: A short description or the full name of a variable.
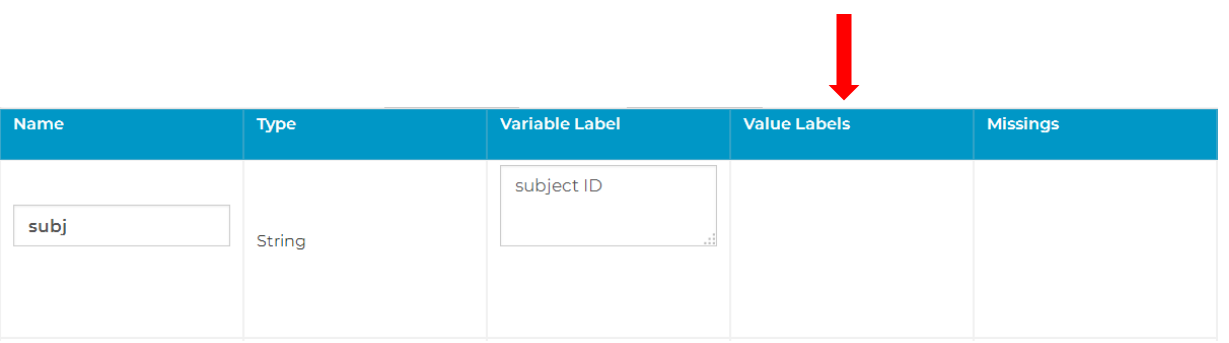
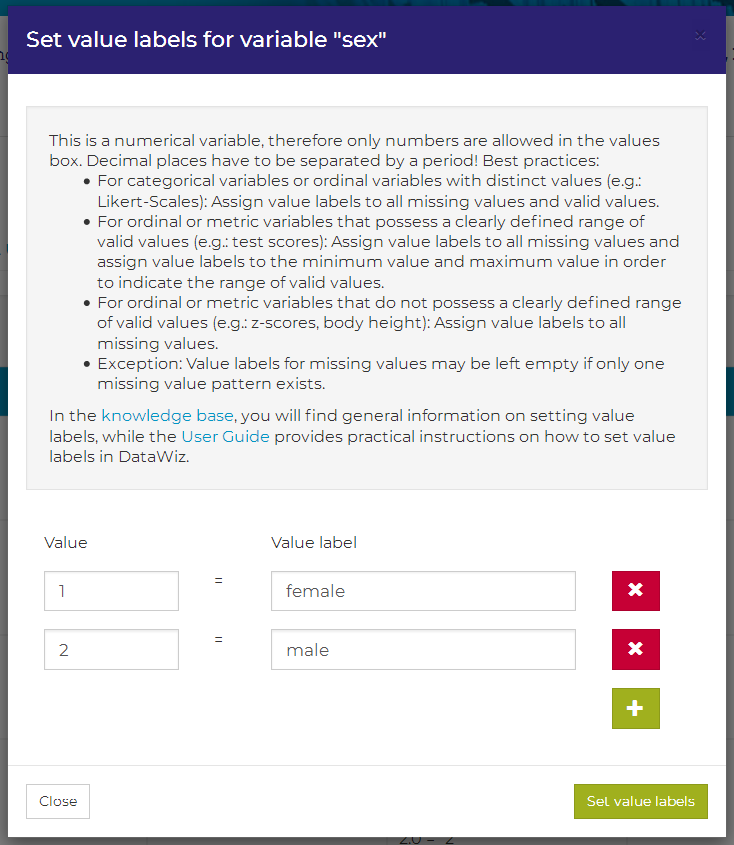
Value Labels: You can add a value label for a certain variable by clicking on the corresponding Values box (see image above). In the value labels dialogue, you can add values and assign labels to them. The width and number of decimal places of the information that you enter in the Value field should not differ from the information that is provided in the columns Width and Decimals of your codebook for this variable. This information is hidden per default and appears if you click on the “…” in the header of your codebook. After you finished assigning values and labels, click on set value labels and the corresponding information is transferred to your codebook. Caution: To prevent loss of information, you have to save your codebook by clicking on the submit button before leaving the dataset. Further information on best practices of assigning value labels are given in the knowledge base’s section on codebooks.
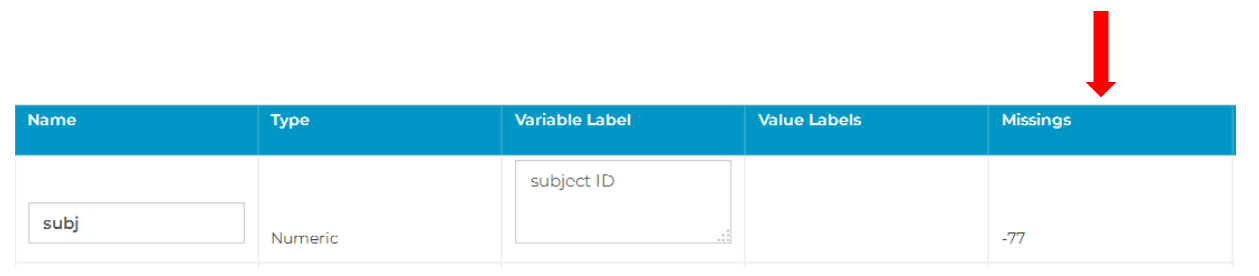
Missing Values: You can define missing values for a variable by clicking on the corresponding Missings box. When setting values for missings you have to determine which kind of missings you want to set; options are:
- No missing values (default). No missing values were coded for this variable. If missing values exist, they are coded as empty fields.

- One missing value. One value was assigned to all missing values of this variable.
- Two missing values. Two different values were assigned to the missing values of this variable.
- Three missing values. Three different values were assigned to the missing values of this variable.
- Range of missing values (only available for numerical variables). Values that fall into a specific range are defined as missing.
- Example: zero is the minimum value of a scale and all values that are smaller than 0.1 are below the detection threshold and are therefore treated as missing.
- Please note: when specifying a range, the lower threshold always has to be entered in the first field, while the upper threshold has to be entered in the second field.

- Range of missing values and discrete missing value (only available for numerical variables). In this case, all values that fall into a specific range are defined as missing, but additionally a specific value is used to code missing values
- Example: zero is the minimum value of a scale and all values that are smaller than 0.1 are below the detection threshold and are therefore treated as missing. Additionally, every person who did not take part in the measurement is assigned the value -99.
- Please note: The range of missing values has to be entered in the first and second field, whereas the single missing value is entered in the third field (see image below).
- Tip: You should define value labels for missing values, which explain what the missing value patterns mean (e.g. missing by design, not applicable, not answered). This is especially important if missing values are coded by several values.
Extended codebook information, which is only relevant for SAV-export, can be shown by clicking on “…” in the codebook header (the extended information is hidden by default). On CSV-data import, the information is automatically set according to the properties of the uploaded data matrix. This information cannot be changed in DataWiz, but only by importing a new data matrix. Extended codebook information includes:
Width: the maximum number of characters allowed for values of this variable. Please note that umlauts count as two characters. Width also sets the maximum length of values used in the value label dialogue.
Decimals: the number of decimal places that are shown in the SPSS data view. Decimals also sets the maximum number of decimal places for values used in the value label dialogue.
Columns: the number of columns that are shown in the SPSS data view.
Alignment: the alignment of the variable’s values in the SPSS data view. For SPSS files this information is extracted from the original file, for CSV-files it is set to left.
Measurement level: the variable’s value’s measurement level following SPSS notation. For SPSS files, this information is extracted from the original file, for CSV-files it is set to unknown.
Role: the meaning of the variable in your analysis following SPSS notation. For SPSS files this information is taken over, for CSV-files role is set to input.
Constructs: Under construct you can assign a construct to the variable. Please note that you can only use this option if you entered information on constructs in the study documentation.
Measurement Occasion: Here, you can assign a measurement occasion to the variable. Please note that you can only use this option if you entered information on measurement occasions in the study documentation.
Instrument: Here, you can assign a measurement instrument to the variable. Please note that you can only use this option if you entered information on measurement instruments in the study documentation.
Item text: In this field, you can enter the exact wording of an item’s text, of a software instruction, etc.
Filter question: Is this variable a filter variable? Depending on participants’ responses on a filter variable, a set of subsequent items/questions will be presented or not. For example, the variable “marital status” is a filter variable if a set of questions is only presented to subjects who stated that they were married.
Set global value labels. If you want to set value labels for all variables of a specific type, choose set global value labels by clicking on the respective button which is located below the codebook. Now a window pops up where you have to define whether the global value label refers to numeric or string variables, by choosing string or numeric under type. Caution: already existing value labels will be overwritten when setting global value labels.

Set global missing values. If you want to set missing labels for all variables of a specific type, choose Set global missing values by clicking on the respective button which is located below the codebook. Now a window pops up where you can set missing values for string and/or numeric variables. Caution: Already existing missing values will be overwritten when setting global missing values.
Changelog: In this field you have to describe which changes were made to the data set. Documenting changes is mandatory for saving the codebook. Keeping a changelog is important in order to document data provenance throughout the research data lifecycle.
Caution:
- All current work on your codebook is lost, if you do not submit changes prior to closing the tab. If saving was successful, a new version is created and the following message appears:

- If problems occur during validation of your entries, your codebook may not be saved. Thus, all current work on your codebook will be lost, if you do not fix these errors and save the codebook prior to closing the tab.
![]()
Data Matrix
In the Data Matrix tab, you can inspect the data matrix of your dataset. You cannot change values of the data matrix inside the DataWiz system. Note that DataWiz automatically standardizes how numerical variables and date variables are displayed. Within the header section above the data matrix, you can select the number of displayed variables via the dropdown menu. You can also filter specific information by using the searchbar on the right. For example, when you enter 99, only variables that contain that number will be shown.

Appendices
Appendix 1: Quick User Guide
Since DataWiz includes a multitude of features, we have prepared two scenarios that help you navigate the features of DataWiz, when you are entering DataWiz for the first time: scenario “all features” and scenario “quick data upload”.
No matter what scenario you choose, you start by creating your own DataWiz account. Thereafter, the two scenarios differ:
Scenario “Quick Data Upload” You want to upload a dataset and share it with your colleagues.
- Log in
- Choose Create Project
- Enter Project Name and click on Submit
- Choose the Contributor tab and invite your contributors and assign global reading or writing rights to each of them (contributor has to accept your invitation first)
- Choose the Studies tab and click on Create Study
- Enter Study Name and click on Submit
- Choose the Dataset tab and click on Create Dataset
- Enter Dataset Name and click on Submit
- Click on Upload File, follow instructions in the opening window and complete data upload
Scenario “All Features”
- Log in
- Choose Create Project
- Enter Project Name and click on Submit
- Before data collection starts…
- complete the project documentation
- choose data management planning and write your data management plan
- export the data management plan
- choose the project materials tab and upload all materials that you want to share with your contributors (e.g. ethics approval, project proposals, standard operating procedures)
- choose the Contributor tab and invite contributors, that you want to have access to data management planning and project materials, and assign global reading or writing rights to each of them (contributor has to accept your invitation first)
- During data collection…
- Choose the Studies tab and click on Create Study
- Enter Study Name and click on Submit
- return to the project level, enter the Contributor tab and invite additional contributors, that you want to have access to the study you created (contributors that have global rights will already have access), and assign study-specific reading or writing rights to each of them
- return to your study
- If you want to pre-register your study, fill out all fields that are indicated by the checkmark

- As soon as more information becomes available, complete the study documentation (at an early stage, it may be convenient to leave information empty if they are not (yet) known or likely to change during data collection).
- choose the study materials tab and upload all materials that pertain to this specific study and that you want to share with your contributors (e.g. informed consent templates, coding instructions, manuals)
- Choose the Studies tab and click on Create Study
- After data collection…
- Enter a study
- Complete the study documentation (at this stage, entering information of fields indicated by the PsychData icon is recommended in order to make data interpretable on the long-term)
- Choose the study materials tab and upload raw data, codes, etc.
- Choose the Dataset tab and click on Create Dataset
- Enter Dataset Name and click on Submit
- Click on Upload File and follow the instructions in the opening window and complete the data upload
- upload a new version of dataset if necessary (e.g. because of removal of erroneous cases)
- export your dataset
- return to project level, enter the Export tab and export your data in order to store it locally or to publish it in a repository
- Enter Dataset Name and click on Submit